
Salads
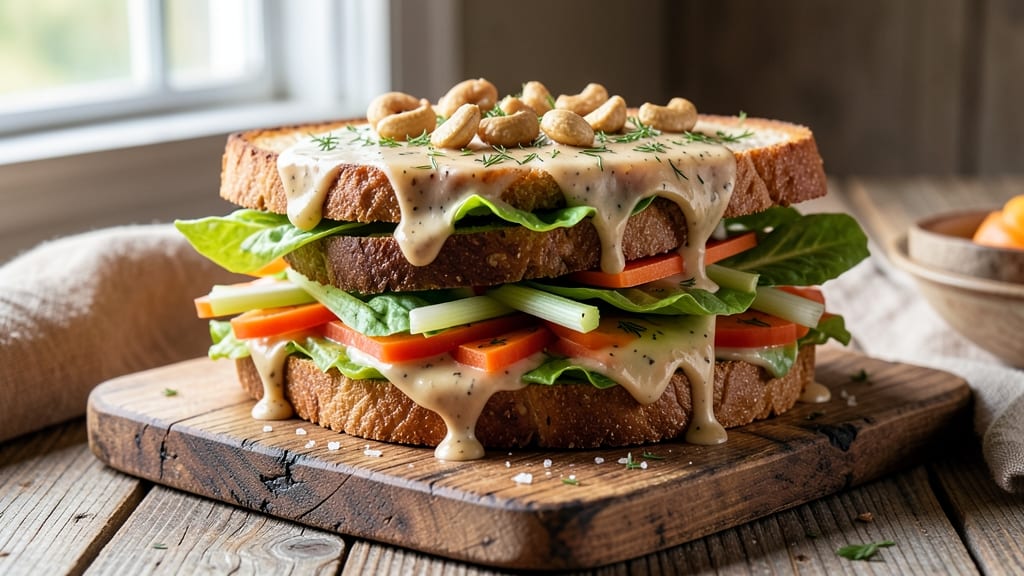
This veg salad sandwich recipe transforms a simple lunch into a creamy, crunchy masterpiece that’s packed with vibrant flavors and plant-based richness. The secret lies in balancing crisp celery crowns with a velvety herb cheese spread—no dairy needed—that binds every layer together without overpowering the fresh veggies.
The foundation starts with sturdy, toasted bread (or gluten-free if preferred) that holds up to the hearty fillings. Layer in crisp lettuce, thinly sliced celery, and shredded carrots for texture, then spread the creamy herb cheese blend—made with cashew cream, fresh dill, and a touch of lemon.
The result? A sandwich that’s foolproof to assemble, satisfying to eat, and perfect for meal prep.
What sets this apart is the harmony of textures: the satisfying crunch of celery crowns, the tender bite of greens, and the smooth, tangy creaminess of the spread.
It’s the kind of sandwich that feels indulgent yet light, making it ideal for lunchboxes, office meals, or a quick yet impressive picnic. Every bite delivers a perfect balance of freshness and richness.
For extra flair, add toasted seeds, pickled onions, or a drizzle of mustard. This recipe scales easily—double the fillings for wraps or sliders—and stays fresh for up to 24 hours when stored properly. Ready to elevate your sandwich game? Let’s build it step by step.
Ingredients for veg salad sandwich
Sturdy bread, crisp veggies, and velvety cashew cream create this plant-based masterpiece.
| Ingredient | Amount | Notes |
|---|---|---|
| Bread Loaves 🍞 | 2 whole | Sturdy sourdough or gluten-free preferred |
| Romaine Lettuce 🥬 | 4 cups | Chopped into bite-sized pieces |
| Celery Stalks 🥬 | 4 whole | Thinly sliced into crowns |
| Carrots 🥕 | 2 medium | Shredded fine with box grater |
| Raw Cashews 🥜 | 1 cup | Soaked 4 hours in hot water |
| Fresh Dill 🌿 | ¼ cup | Chopped finely for freshness |
| Lemon Juice 🍋 | 2 tbsp | Freshly squeezed for tang |
| Extra-Virgin Olive Oil 🫒 | ¼ cup | High-quality for creaminess |
| Nutritional Yeast 🧀 | 2 tbsp | For cheesy umami flavor |
| Salt 🧂 | 1 tsp | Kosher or sea salt |
| Black Pepper 🌶️ | ½ tsp | Freshly ground preferred |
| Sunflower Seeds 🌻 | ¼ cup | Toasted for extra crunch |
| Mustard 🍯 | 1 tbsp | Dijon for tangy kick |
The bread is non-negotiable—sourdough or a sturdy whole grain holds up best to the wet fillings. Trader Joe's and Whole Foods carry excellent gluten-free options if needed. For the celery crowns, slice the stalks lengthwise into thin strips (about 1/8-inch thick) for maximum crunch. The carrots should be fresh, firm, and bright orange—avoid anything rubbery or limp. If you're prepping ahead, slice the veggies and store them separately in airtight containers for up to 3 days.
No cashews? Macadamia nuts or almonds work in a pinch, though the texture will differ slightly. Fresh dill is ideal, but dried dill at one-third the amount will work if you're in a bind. For extra richness, add 1 tbsp tahini to the cashew cream. The nutritional yeast is what gives that cheesy depth—Bob's Red Mill is a reliable brand. If you love mustard, double the amount for a tangier bite. The sunflower seeds can be swapped for pumpkin seeds if you prefer a nuttier flavor.
The cashew cream keeps for 5 days in the fridge, covered with a thin layer of water to prevent browning. Assemble sandwiches just before eating to maintain crispness—toast the bread fresh and spread the cream generously. Store filled sandwiches in a paper towel-lined container for up to 6 hours to keep them from getting soggy. For meal prep, pack the components separately and assemble when ready to eat.
Why You'll Love This Recipe
- No-Cook Magic: I swear by this when I’m too tired to chop more than a handful of celery stalks. Toss the romaine, shred the carrots, and pulse the cashews—no knife skills required, just assembly. It’s the kind of meal that feels like a hug for your lunchbox.
- Crunchy Creamy Contrast: That raw cashew "dressing" is where it shines—no mayo, no weird aftertaste, just rich, nutty creaminess. Pair it with the sharp bite of celery and the crisp romaine, and you’ve got a texture play that keeps every bite exciting.
- Lunchbox Superstar: Between us, this is my go-to for packed lunches or quick office meals. The bread holds up all day, the veggies stay crisp, and the cashew dressing won’t leak like some sad, soggy mayo. Honestly, it’s the only sandwich I trust to survive a crowded desk drawer.
- Budget-Friendly Staples: I make this at least twice a week, and it never breaks the bank. Romaine lasts forever, carrots are cheap, and cashews stretch further than you’d think. Plus, it’s the kind of recipe where leftovers taste just as good cold the next day—no waste, all flavor.
Step-by-step instructions for veg salad sandwich assembly
Here's how to build the perfect crunchy-creamy sandwich with layers that stay fresh and flavorful.
Prepare the Creamy Herb Cheese Spread
Drain the soaked 1 cup raw cashews thoroughly and transfer them to a food processor. Add the 2 tbsp nutritional yeast, 0.25 cup extra-virgin olive oil, 2 tbsp lemon juice, 1 tbsp mustard, 1 tsp salt, and 0.5 tsp black pepper. Process until completely smooth, scraping down the sides as needed—this should take about 3-4 minutes. The mixture should be thick but spreadable, like hummus.
With the processor running, gradually add the 0.25 cup fresh dill and continue blending until fully incorporated. Taste and adjust seasoning if needed—you might want a touch more lemon juice for brightness or salt for depth. Transfer the spread to a bowl and set aside. This creamy base is what ties all the sandwich components together.
Assemble the Crunchy Vegetable Mix
In a large mixing bowl, combine the 4 cups chopped romaine lettuce, 4 whole celery stalks sliced into crowns, and 2 medium carrots shredded finely. Sprinkle with 0.25 cup toasted sunflower seeds and toss gently to distribute evenly. The texture contrast between the crisp celery, tender lettuce, and nutty seeds creates the perfect crunch foundation.
Drizzle the vegetable mix with 1 tablespoon extra-virgin olive oil and toss again to lightly coat. Season with an additional 0.25 tsp salt and 0.25 tsp black pepper to enhance the natural flavors. Let the mixture sit for 5 minutes before assembling—this allows the flavors to meld slightly and prevents sogginess when combined with the spread.
Prepare the Bread for Assembly
Slice each of the 2 whole bread loaves horizontally into 4 equal pieces (about 1-inch thick per slice). For sturdy sourdough, you may want to lightly toast the slices for 1-2 minutes on each side until just golden—this prevents sogginess from the creamy filling. Let the toasted slices cool completely before assembling.
Spread a generous 2 tablespoons of the creamy herb cheese mixture onto each bread slice, leaving about ½-inch border uncovered. This ensures the filling stays contained and prevents mess when biting into the sandwich. The spread should be thick enough to hold the vegetables but still allow for easy assembly.
Layer and Press for Maximum Freshness
Place 2 tablespoons of the crunchy vegetable mix onto one side of each spread bread slice. Top with another slice, spread-side down, to create a 4-slice sandwich. Press gently but firmly to compress the layers—this helps the sandwich hold together and prevents the filling from spilling out. For extra stability, you can lightly toast the assembled sandwiches in a pan over low heat for 1-2 minutes per side until golden.
Cut each sandwich diagonally into 2 equal triangles for easy handling. Serve immediately while the bread is still warm and the vegetables retain their crisp texture. The combination of creamy, crunchy, and fresh elements creates a balanced bite that stays satisfying for hours—ideal for lunch or a light dinner.
Pro Tips For Making Veg Salad Sandwich
- SOAK CASHEWS 10 MINUTES: I learned this the hard way—raw cashews stay stubbornly crunchy unless they get a head start. Toss them in warm water for 10 minutes before chopping, then drain and pat dry. This softens them just enough to blend smoothly into the salad without grittiness, and they’ll hold up better when stacked between bread.
- JULIENNE CARROTS FAST: Skip the peeler and use a sharp knife instead. Cut carrots in half lengthwise, then slice thin strips with the knife held flat against the cutting board—like you’re shaving. Takes 30 seconds instead of 5 minutes, and the texture stays crisp. (Yes, even if you’re impatient like me.)
- DRY LETTUCE WELL: Romaine wilted from soggy lettuce ruins everything. After washing, spin it in a salad spinner until completely dry, then pat the core with a paper towel. Wet lettuce makes the bread soggy within 20 minutes—this guarantees your sandwich stays crisp for hours.
- TOAST BREAD SLIGHTLY: Cold bread = sad sandwich. Toast the loaves for 30-45 seconds on medium heat until just warm and slightly firm. Not crispy, just sturdy enough to hold the fillings without collapsing. I skip this and regret it every time.
Storing and reheating your leftovers
Refrigerator Storage
Store the creamy herb cheese spread in an airtight container with a layer of water on top to prevent browning—it keeps fresh for 5 days in the fridge. For the veggie mix, place it in a separate container with a paper towel underneath to absorb excess moisture.
Keep the bread slices wrapped in parchment paper to maintain crispness. Assemble sandwiches only when ready to eat to preserve texture. 🥪
Freezer-Friendly Components
Freeze the cashew cream spread in 1-tablespoon portions on a tray before transferring to a bag—this prevents clumping. The veggie mix freezes well for 2 months if stored in a single layer before bagging.
Toasted bread freezes best when wrapped individually in plastic wrap and placed in a freezer bag. Thaw overnight in the fridge before assembling. ❄️
Reheating Assembled Sandwiches
For best results, reheat sandwiches in a skillet over medium heat for 1-2 minutes per side until golden. Cover with a lid to melt the spread slightly without drying the bread.
Alternatively, use a toaster oven at 350°F for 3-4 minutes to maintain crispiness. Avoid microwaving—it turns the bread soggy. 🔥
Preventing Sogginess
To keep sandwiches fresh longer, store components separately and assemble only when eating. If you must prep ahead, place a paper towel between layers and store in a cool, dry place for up to 6 hours.
For meal prep, pack the spread and veggies in separate containers—add them to toasted bread just before serving. 💡
Reviving Stale Bread
If the bread loses crispness, revive it by toasting in a dry pan over medium heat for 30 seconds per side or using a toaster. For gluten-free bread, lightly brush with olive oil before toasting to restore crunch. Never microwave—it makes sandwiches gummy. ✨
Leftover Spread Uses
Use leftover cashew cream on toast, crackers, or wraps—it’s versatile! Store in the fridge for up to 5 days or freeze in ice cube trays for portion control.
Add a splash of lemon juice when reheating to brighten flavors. Perfect for quick lunches or as a dip for veggies. 🌿
Nutrition facts
Frequently asked questions
Can I make this veg salad sandwich gluten-free?
Use a sturdy gluten-free bread like sourdough-style or seed-based loaves from brands such as Canyon Bakehouse or Schär. For extra crispiness, toast the slices longer than regular bread—gluten-free varieties can absorb moisture faster. The cashew spread and veggie filling remain exactly the same.
How do I keep the celery crowns extra crispy?
For maximum crunch, slice the celery just before assembling and store it in a paper towel-lined container with a dry tea towel on top. This absorbs excess moisture. Add a pinch of salt to the celery right before slicing—it draws out water and keeps it crisp. Avoid washing sliced celery until ready to use.
What if I don't have a food processor for the cashew spread?
No problem! Soak the cashews overnight, then blend them with all ingredients in a high-powered blender. For a smoother texture, strain the mixture through a fine-mesh sieve. If you only have a regular blender, pulse frequently and scrape down the sides. The result will be slightly grainier but still delicious.
Can I make this sandwich ahead of time?
For best texture, assemble the sandwiches just before eating. However, you can prep components separately: store the cashew spread in an airtight container for 5 days, keep veggies dry in a sealed bag for 3 days, and toast bread fresh. Assemble within 1 hour of eating to maintain crispness.
What's the best way to pack this for lunch?
Pack the sandwich components separately: wrap toasted bread in parchment paper, store the cashew spread in a small container, and keep veggies in a leak-proof container with a paper towel. Assemble at lunch by spreading the cream on fresh bread and adding the veggies. This keeps everything fresh and prevents sogginess.